Why Is My Orchid Stem Turning Yellow - How to Treat
Written by Ivy
Feb 07 2023
Overexposure to direct light, excessive watering, or bacterial and fungal infections that cause orchid stems to turn yellow. However, if the only portion of the stem that is holding the bloom has turned yellow, the flower spike is on its last legs. To allow the yellow flower spike to dry and fall off naturally, cut it down.
Quick Look:
- Sunlight
- Moisture stress
- Fungus and Pest Infestation
- Aging
- Nutrient Deficiency
- Lack of Humidity
- Unclean Water
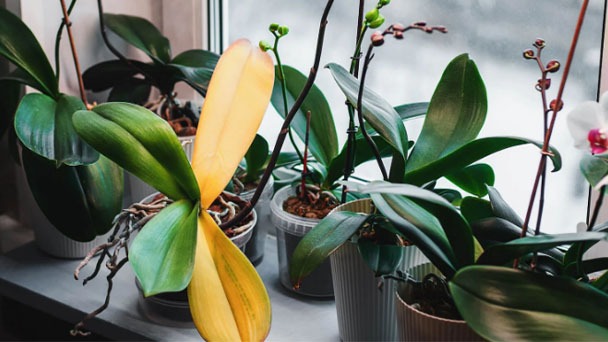
Why is My Orchid Stem Turning Yellow
Orchid Stems Naturally Turn Yellow and Brown After Flowering
Once the orchid has finished flowering, the stems start to turn yellow and dry out. After the flowers have fallen off, orchid stems always turn yellow and start to die back. This is a normal part of the plant's cycle and does not indicate that the orchid is dying.
There are some exceptions, but most orchid stems can only support one set of blooms each year before they start to turn yellow and dry out.
The orchid typically turns yellow from the top after the flowers have fallen off and dries out.
How to Save It
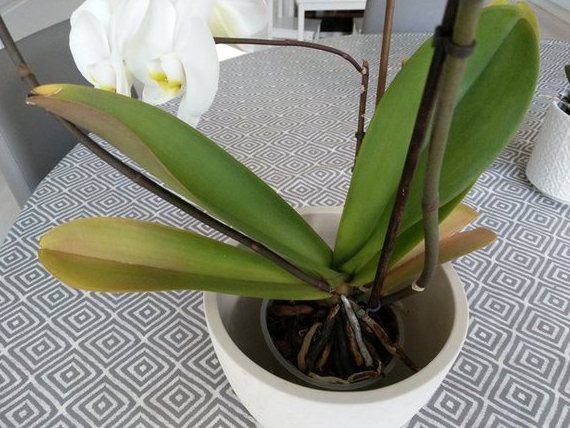
You don't necessarily need to do anything as long as the leaves are green and the roots appear healthy (healthy roots are green and plump after watering and have a slightly gray appearance).
Some orchid experts believe that you should let the stem turn yellow and dry out because the orchid is recovering the nutrients it invested in the stem. This can take a while, so your orchid might not produce flowers for a while.
However, some people, including myself, believe that it is best practice to use a sharp pair of pruners to cut the yellowing orchid stem back to the base after it has started to turn yellow because doing so encourages the growth of a new stem (or flower spike).
In particular, if you take good care of the orchid by placing it in bright indirect light and using a specific orchid fertilizer, you won't have to wait as long for new blooms because pruning helps promote the growth of a new healthy stem that can display more flowers.
Alternatively, if a portion of the stem is still green, you can cut the yellowing flower stem just above a node that hasn't yet produced flowers. If the circumstances are right, a new stem may even develop from the node, which will then naturally produce flowers in the coming weeks.
It should be noted that any flowers that emerge from a node typically have a smaller initial bloom than the bloom produced by a new flowers spike. For this reason, I advise cutting the stem back to the base, which encourages the growth of a much stronger stem with a more impressive flower display.
Sun Burn Causes Orchid Stems to Turn Yellow
If exposed to excessive sunlight, orchid stems turn yellow. Orchid stems and leaves require either filtered or indirect light because they are adapted to growing in the shade of a forest canopy. The leaves and stem turn scorched yellow in direct sunlight.
In their natural habitat, phalaenopsis orchids (also known as moth orchids) grow as epiphytes (plants that grow on other trees) in tropical forests, where they are exposed to either bright, indirect light or some scattered light among the leaves.
Because of this, the orchid's leaves and stems are extremely sensitive to intense sunlight and as a result, they quickly turn a scorched yellow.
- Read More: Why Are My Orchid Leaves Turning Yellow
How to Save It
To avoid scorching the plant, move the orchid to a spot with strong indirect light.
The stem loses its appearance and becomes too damaged to support flowers if it has been severely scorched, turning from green to yellow.
If the stem has been harmed by sunlight, I would personally suggest simply pruning it all the way down to the base with a good pair of pruners. The orchid can focus its energy and resources on growing a new, healthy stem that can support a stronger bloom when the conditions are favorable by cutting the damaged stem back to the base.
It's important to note that orchids can grow new stems and bloom at any time of year, but they usually bloom in the spring and summer because of the longer days and brighter light.
I advise using a specific orchid fertilizer to make sure the orchid has the nutrients it needs to grow. This fertilizer gives orchids the right nutrients at the right concentration so they can focus their energy on developing new flower stems and showing off their blooms.
Orchid Stem Turning Yellow Because of Overwatering
Yellow orchid stems and leaves may be a sign that root rot is killing the plant's roots. Orchids require potting soil that is porous and slightly dries out in between waterings. The roots die back and the stem and leaves turn yellow if the soil is overly moist or compacted in the potting medium.
In their native tropical environment, orchids are epiphytes, meaning they grow on trees rather than terrestrial plants, which grow in soil.
Because of this, orchid orchids require a potting medium that mimics their natural surroundings, allowing for proper drainage, air circulation around the roots, and ideally humid conditions.
Based potting soils are the best for growing orchids. If the orchid is in regular potting soil or compact moss, the roots will rot and die because the potting mediums retain too much moisture and are too dense for the orchid to tolerate.
If too many roots disappear, the remaining ones will not be able to absorb enough moisture or nutrients to support the leaves and stems, resulting in the loss of flowers and the yellowing of the stems and leaves.
How to Save It
Reducing watering is crucial to saving the orchid because it allows the potting soil to slightly dry out between applications of water.
Orchid stress can be decreased by misting the leaves to increase humidity.
Examine the roots of the orchid by removing it from the potting medium. Healthy roots should be green immediately after watering and gradually turn gray between waterings, with a firm, plump texture.
When soil compaction and excessive watering cause unhealthy roots to die back, they turn papery, gray, and shrivel up.
With a good pair of pruners, cut off the unhealthy, dying roots, either back to the base or to the healthy growth.
Change the potting soil for pine bark-based orchid potting soil, which mimics the native conditions of orchids and allows for good drainage and air circulation around the roots.
Repot the orchid in a container with drainage holes in the bottom, ideally one made of transparent plastic so you can see the condition of the roots and more easily determine when your orchid needs watering.
A clear pot also makes it possible for the sunlight to reach the orchid roots, which can also photosynthesize and aid in the orchid's regeneration.
How to Prevent Yellowing of Orchid Stems
Fix the Environment
If your orchid flower spike or the stems turn pale due to exposure to direct sunlight, try changing their environment. Keep them somewhere shaded, perhaps by a window or behind a wall where only a little bit of light can enter. To keep light away from your orchid, you can also use a curtain.
Additionally, you have the option of using artificial lighting that you can easily control and adjust to the needs of the plant. The goal is to protect your orchid from overexposure to sunlight, which could harm it.
Avoid Floods and Droughts
Insufficient water is to blame if you notice your orchid losing leaves and gradually turning yellow instead of remaining healthy and bright green. To overcome this, soak it in a bucket of water for at least twelve hours. It should keep your plant from dying, hopefully.
You should be careful not to overwater it when watering, though. Although orchids prefer high levels of moisture and humidity, overwatering harms the stems and could ultimately cause them to die.
It is possible to use a pot that has been thoroughly drained. Wet your plant thoroughly, but let the excess water immediately drain out of the bottom drainage holes once it has dried out roughly halfway down from the top of the potting soil. While orchids like humidity, they do not like soggy soil. You can wait longer between watering your plant and checking the soil for mold and moisture.
Improve the Humidity
The value of humidity for orchid health cannot be overstated. Boost the humidity in the area to solve this issue. In order to achieve this, you can either water your orchid or place a humidity tray underneath the pots. The water in the tray will evaporate throughout the day and add humidity to your orchid.
It's important to keep the orchid exposed to light while adjusting the humidity levels around it. The stem yellowing should disappear after these improvements in a few weeks.
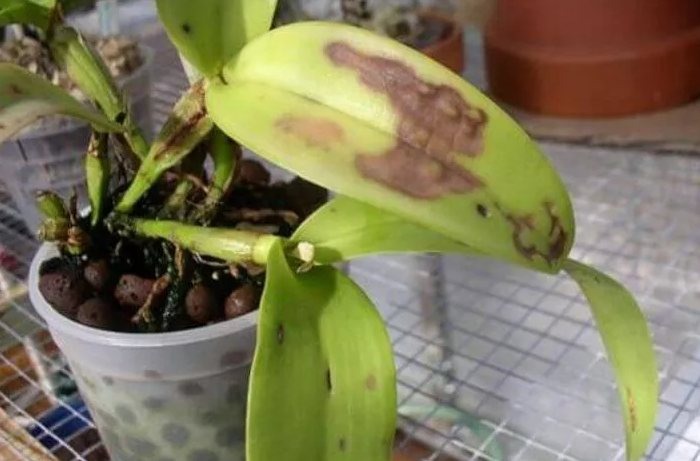
Prune the Infected Parts
It is a sign that your orchid has a fungal infection when the leaves begin to turn brown and drop off one by one.
You will need to prune in order to solve this issue. Use clean gardening shears or scissors to cut your orchid spike below the yellow stems. Sprinkle cinnamon powder on the cut end. Cut below the yellowed area and sprinkle with cinnamon powder if the yellowing spreads further down.
To encourage the plant to concentrate on its healthier parts, you can trim off any dead stems or orchid spikes. However, make sure you differentiate between the healthy and unhealthy Orchids or flower spikes of the plant while the healthy stems are bright green while dead ones are brownish and yellowish.
Additionally, when a flower falls off a flower spike, pruning is required because it needs to be cut back. When cutting, exercise caution and cut the stem two nodes up from where it emerges from the plant's base.
Use Clean Water
When watering your orchids, make sure to use pure, fresh water. Water can accumulate toxic substances over time. Similar to this, too much calcium in the soil can cause stems to yellow. Most of the time, calcium-rich water increases the amount of calcium in the soil. So to prevent this nasty sight from happening, always use fresh and clean water.
Key Takeaways
- Because this is a normal phase of the orchid's life cycle, the reason that orchid stems turn yellow after the flowers have fallen off is that they do so. After the orchid blooms, the stem that carried the flowers dries out and turns yellow from the top before a new stem emerges that can carry additional flowers.
- When exposed to excessive amounts of direct sunlight, orchid stems and leaves can turn yellow. Orchids are adapted to growing in the shade, and sunburn can scorch the color of their delicate leaves and stems.
- Orchid root rot may be indicated by yellowing stems and leaves. Overwatering and compacted soil can cause the roots to rot, which prevents them from carrying nutrients and moisture to the leaves, causing the stems and leaves to turn yellow and wither.
- With a sharp pair of pruners, remove the flowering portion of the yellowing orchid stem and cut it back to the base. A new flower spike that can produce more blooms can grow after the yellow stem is pruned.
Frequently Asked Questions
Why is the Tip of My Orchid Stem Turning Brown?
The orchid's stem, also known as its flower spike, is where the lovely blooms are held. An orchid enters a dormant state after blooming, which causes the tips to brown. The orchid recovers during this time and enters a state where it can produce more beautiful blooms.
How Often Should I Water My Orchid Plant?
In general, Orchids get thirsty about once a week but more often if you have it outdoors. For more precise scheduling of the watering time, you can perform a quick test. If you stick your finger about an inch into the ground, the soil is too dry and needs to be watered.
How Can I Stimulate Blooming in My Phalaenopsis Orchid?
To stimulate the blooming again, shift your Phalaenopsis orchid to a chill room at nighttime, and preferably, place it by the window. The plant will be aided in blooming by the ensuing cold. The plant can be harmed by being placed in front of cold air bursts, so avoid doing so.
Conclusion
We hope that this guide has been helpful enough for you to understand how to properly care for orchids. But before we finish, allow us to go over the main points once more.
Latest Updated
- Why Is My Orchid Stem Turning Yellow - How to Treat
- How to Grow and Care for Cymbidium Orchid (Boat Orchids)
- Why Do My Hibiscus Leaves Turn Yellow - Should I Cut Off Them
- Why Are My Orchid Leaves Turning Yellow - Common Causes & Fixs
- Why Are My Tomato Leaves Turning Yellow - 7 Reasons & Solutions
- 12 Amazing Peace Lily Benefits to Keep Your Garden Fresh!
- Asian Virginsbower Growing & Caring Guide
- How to Grow and Care for Ponytail Palm (Beaucarnea Recurvata)
- How Much Light Does Ponytail Palm Need Indoors?
- Overwatered Ponytail Palm - Signs & How to Save It
Popular Articles
- Winter maintenance of Antirrhinum Majus
- How to Grow Terminalia Mantaly Tree
- How to Grow and Care for Crossostephium Chinense
- How to grow Antirrhinum Majus in spring
- Peristeria Elata (Dove Orchid) Profile: Info & Care Guide
- Underwatered Snake Plant (Sansevieria Trifasciata) - Signs And How To Fix
- How to Care for Brazilian Jasmine Plant (Mandevilla Sanderi)
- Rosa Chinensis (China Rose): Plant Growing & Care Tips
- How to Grow & Care for Graptopetalum Purple Delight in Summer
- How to Care for Baby Sun Rose (Aptenia Cordifolia)