How To Repot Alocasia Polly?
Written by Ivy
Dec 22 2021
If we want Alocasia Polly to grow vigorously and have beautiful leaves, we need to do a good job in the management of changing pots, timely replace new flower pots and soil, give plants enough growth space, and avoid barren, hardened and hardened soil, so as to better promote the growth of Alocasia Polly. So how should Alocasia Polly be repotted? What problems should we pay attention to after repotting? Now I'll give you a detailed talk about Alocasia Polly's repotting skills.
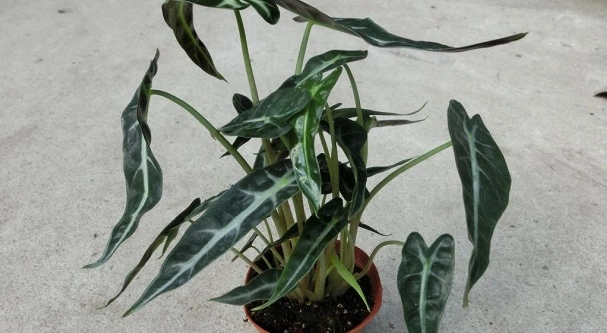
For Alocasia Polly, timely pot change is more important because Alocasia Polly has large and plump leaves and fast plant growth, which requires a large amount of nutrient supply to meet the growth needs of the whole plant. In addition, due to the rapid growth of Alocasia Polly, the old basin can not better accommodate the whole plant after growing to a certain extent, which virtually hinders the downward extension of Alocasia Polly's root system and is not conducive to the development of root system. Only by replacing the basin soil in time can we solve a series of problems such as limited growth space and insufficient nutrients in the basin soil, In order to better promote the growth of Alocasia Polly and make the leaves emit charming colors.
Read More:
What Is The Best Soil For Alocasia Polly?
When changing pots for Alocasia Polly, it is necessary to avoid the cold period, so as to avoid too low temperature hindering the germination of new roots and affecting the pot serving of plants. The best time to change pots is around April in spring. At this time, the light is relatively mild and the temperature basically tends to be stable (about 20 ℃), and the plant activity is relatively strong at this time. Therefore, choosing to change pots at this time can accelerate the growth of new roots and greatly improve the success rate of Alocasia Polly's pot change. Alocasia Polly's pot changing method is actually very simple. It is nothing more than four small steps: selecting flower pots, preparing soil, removing pots and planting in pots. The details are as follows:
Read More:
How Much Light Does Alocasia Polly Need?
Read More:
How Much And How Often To Water Alocasia Polly?
Why Repotting Alocasia Polly?The Best Time for Alocasia Polly to RepotOperation Method of Alocasia Polly RepottingPrecautions for Alocasia Polly after basin changeIlluminationWateringTemperatureSummary
Why Repotting Alocasia Polly?
When Alocasia Polly grows to a certain extent, there will be root crowding, which hinders the further growth of Alocasia Polly to a certain extent, and even weakens the growth of plants. In addition, due to long-term watering, fertilization and other maintenance measures, it is easy to harden and even alkaline basin soil, which will seriously hinder the respiration of roots and is very unfavorable to the growth of slightly acidic plants. Therefore, only by timely repotting alocasia polly basin can the roots have enough growth space and keep the soil loose and fertile, Thus promoting the growth of the whole Alocasia Polly.For Alocasia Polly, timely pot change is more important because Alocasia Polly has large and plump leaves and fast plant growth, which requires a large amount of nutrient supply to meet the growth needs of the whole plant. In addition, due to the rapid growth of Alocasia Polly, the old basin can not better accommodate the whole plant after growing to a certain extent, which virtually hinders the downward extension of Alocasia Polly's root system and is not conducive to the development of root system. Only by replacing the basin soil in time can we solve a series of problems such as limited growth space and insufficient nutrients in the basin soil, In order to better promote the growth of Alocasia Polly and make the leaves emit charming colors.
Read More:
What Is The Best Soil For Alocasia Polly?
The Best Time for Alocasia Polly to Repot
If you want to know the best time for Alocasia Polly to change pots, you must first understand the growth characteristics of Alocasia Polly. Alocasia Polly is a warm plant. The most suitable growth temperature is about 20 degrees. Spring and summer are its peak growth seasons. At this time, Alocasia Polly has strong activity and high demand for water and nutrients. After entering autumn and winter, the temperature gradually decreases and the activity of the plant begins to weaken. At this time, thermal insulation needs to be done, So that Alocasia Polly can safely survive the whole cold period.When changing pots for Alocasia Polly, it is necessary to avoid the cold period, so as to avoid too low temperature hindering the germination of new roots and affecting the pot serving of plants. The best time to change pots is around April in spring. At this time, the light is relatively mild and the temperature basically tends to be stable (about 20 ℃), and the plant activity is relatively strong at this time. Therefore, choosing to change pots at this time can accelerate the growth of new roots and greatly improve the success rate of Alocasia Polly's pot change.
Operation Method of Alocasia Polly Repotting
- Selection of Flowerpots: Although Alocasia Polly likes wet flowers, it should avoid soil ponding. If the soil is excessively wet for a long time, it will hinder root respiration and decay, which is not conducive to plant growth. Therefore, when selecting flowerpots, we should pay attention to the performance of air permeability and drainage.
- Pot Suggestion: when actually planting Alocasia Polly, many flower friends will choose porcelain pots. Although porcelain pots are beautiful and generous, their air permeability and water permeability are relatively poor, which is unfavorable to the respiration of roots, so I don't recommend them. I recommend ceramic pots, commonly known as tile pots, which are made of clay. They have superior air permeability and drainage, and are affordable. They are an ideal choice for planting Alocasia Polly.
- Prepare Soil: The selection of soil is very important for the growth of Alocasia Polly. Good soil can promote the germination of new roots, make the plant quickly pass the slow pot period and recover its growth. Alocasia Polly likes to grow in a loose, fertile, drained and breathable soil environment, so we should also pay attention to its soil friendliness when preparing soil.
- Soil Suggestion: according to the soil characteristics of Alocasia Polly, we can use 6 parts of peat soil, 2 parts of garden soil and 2 parts of sandy soil. Both peat soil and garden soil have certain nutrient content, while sandy soil has good drainage permeability. The combination of the three has the characteristics of good looseness, fertility and drainage permeability, which meets the soil requirements of Alocasia Polly.
- Basin Removal Treatment: after the above two steps are completed, the basin removal treatment of Alocasia Polly is required. In the early stage of basin removal, water control measures should be taken to keep the soil slightly dry and facilitate the removal of plants. When removing the pot, first tap the side wall of the pot with your hand. After the pot soil is separated from the pot, turn the pot upside down, then hook the bottom opening of the pot with your hand, hold the plant with the other hand and gently pull it out to take out the plant. After Alocasia Polly is taken out, we need to properly prune the roots, cut off some diseased roots, weak roots, old roots and rotten roots, so as to promote the germination of new roots. After pruning, soak them in carbendazim solution for 20 minutes, and take corresponding disinfection measures to avoid infection of bacteria on the trimmed wounds. After soaking, put them in a ventilated place for air drying, After drying, it can be planted in pots.
- Plant in the Pot: After the above three steps are completed, Alocasia Polly can be planted in the pot. When putting Alocasia Polly in the pot, it can be filled with new soil prepared in advance after straightening, filled and fixed, and then placed in a ventilated place for curing.
Precautions for Alocasia Polly after basin change
After repotting, Alocasia Polly also needs to do corresponding maintenance and management to promote the germination of new roots and speed up the pot service of plants. More attention should be paid to the three aspects of light, watering and temperature.Illumination
During the slow basin period, the overall growth of Alocasia Polly is relatively poor, and the new roots are in the state of waiting for germination. Due to the damage of the old roots and the temporary maladjustment to the new environment, it is also relatively weak. At this time, do not expose Alocasia Polly under strong light to avoid dehydration of the plant. It is best to keep it in a ventilated and cool place for a week, and then give some astigmatism irradiation appropriately. After the new environment is adapted and the growth is restored, gradually increase the light intensity, which is more conducive to plant growth.Read More:
How Much Light Does Alocasia Polly Need?
Watering
After Alocasia Polly repotting, due to the poor absorption capacity of roots, do not water a lot at this time, so as to avoid too much water hindering root respiration, root rot and finally failure of pot change. When watering each time, the soil dryness can be observed. After the soil surface turns white, an appropriate amount of water can be added to wet the soil. Of course, you can often spray some water around the plant to meet the wet loving characteristics of Alocasia Polly, so as to speed up the service basin of the plant.Read More:
How Much And How Often To Water Alocasia Polly?
Temperature
Alocasia Polly is a warm flower, and the most suitable growth temperature is about 20 ℃. After repotting alocasia Polly, it is necessary to do a good job in temperature management. When the temperature is too high, a series of measures such as ventilation and water spraying can be taken to achieve the purpose of cooling. When the temperature is too low, it can be moved to indoor maintenance. At the same time, temperature increasing measures can be taken to avoid frostbite.Summary
It is not very difficult for Alocasia Polly to repot. To sum up, it is nothing more than selecting the best time for changing pots, mastering the correct method for changing pots, and doing a good job in maintenance and management after changing pots. In particular, paying more attention to lighting, watering and temperature can speed up the pot serving time of plants and make Alocasia Polly grow strong and vigorous.Latest Updated
- Benefits of Bugleweed - 7 Science-backed Health Benefits
- Bugleweed Dangers & Side Effects - Is It Poisonous?
- How to Plant Evergreen Trees - What You Should Know
- When to Plant Evergreens - Grow Guide for Evergreen Trees
- 12 Wonderful Evergreen Shrubs for Your Garden
- 12 Popular Evergreen Plants with Pictures for Beginners
- When And How To Prune A Lilac Bush Like a Pro
- How to Grow & Care for Lilac Vine (Hardenbergia Violacea)
- Japanese Lilac Tree (Syringa Reticulata) Care & Propagation Guide
- Shumard Oak Pros and Cons - What to Know
Popular Articles
- Winter maintenance of Antirrhinum Majus
- How to Grow Terminalia Mantaly Tree
- How to Grow and Care for Crossostephium Chinense
- How to grow Antirrhinum Majus in spring
- Peristeria Elata (Dove Orchid) Profile: Info & Care Guide
- Underwatered Snake Plant (Sansevieria Trifasciata) - Signs And How To Fix
- How to Care for Brazilian Jasmine Plant (Mandevilla Sanderi)
- How to Grow & Care for Graptopetalum Purple Delight in Summer
- Rosa Chinensis (China Rose): Plant Growing & Care Tips
- How to Care for Baby Sun Rose (Aptenia Cordifolia)