How to Repot Ponytail Palm - A Guide To Transplant
Written by Ivy
Feb 01 2023
Are you prepared to repot your Ponytail Palm (Beaucarnea recurvata), and do you want to ensure that everything is done correctly? I'll walk you through the process of how I re-potted my own plant. Allow me to demonstrate the three most crucial things you need to know in order to succeed.
I've had my own Ponytail Palm in the same pot for almost 5 years, ever since I bought it, and it had gotten very pot bound. I'm going to walk you through the exact steps I took to repot it, and how I knew it was time to do so.
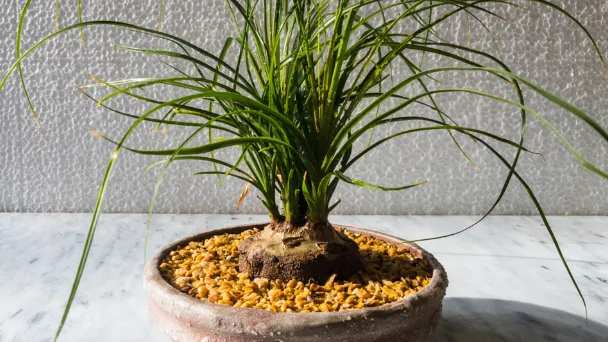
About Ponytail Palms
.webp)
The ponytail palm is an agave plant, not a palm at all. It shares a close relationship with arid-area plants like Joshua trees. Ponytail palms can reach heights of 30 feet in Mexico, according to the Old Farmer's Almanac, but in cultivation, they typically don't exceed 3 feet. In America, these plants are grown outdoors. Department of Agriculture plant hardiness zones 10 through 11, but are excellent houseplants in any climate.
The plant's ability to store water and endure dry spells is due to the adaptation of its thick trunk base. It can grow up to 7 feet across in the wild, but as a houseplant, it is much smaller. The thick base stem quickly becomes thinner, and the tufts of green, leathery leaves that resemble a pony's tail emerge from the stem top. According to Our House Plants, indoor plants can produce leaves that are up to 3 feet long, but in the wild, they can grow up to 6 feet long.
In their native environment, ponytail palms produce flowers that are creamy yellow. Ponytail palm indoor plants can also occasionally bloom in this dazzling way, though it is uncommon. Try to find them in the spring or summer.
Can I Replant My Ponytail Palm?
The plant only requires repotting every other year at most for ponytail palm. The ponytail palm will have room to expand in both height and girth if it is moved to a larger pot.No matter how big it is, repotting or transplanting a ponytail palm is completely possible. If you follow the general instructions, you can replant ponytail palms yourself. Large ponytail palms, however, must be transplanted with the aid of many strong arms and even a tractor.
Consider your options carefully before transferring a potted ponytail palm to a larger pot. Ponytail palms in pots thrive best when root-bound. Ponytail palm replanting may not be a good idea if you're trying to grow it as a bonsai because it encourages the plant to grow bigger.
When to Repot Ponytail Palm
Every plant eventually requires a larger pot. For many years, my own plant flourished in the same pot while growing beautifully, but eventually the soil began to dry out much more quickly than it had previously.
Which is GOOD because you want the soil to dry out quickly, but because of this, I assumed that the plant was pretty root-bound.
How to Repot Beaucarnea Recurvata, Or Ponytail Palm
1. Loosen the Root Ball
You'll have to work to partially untangle the root ball when plants become severely root-bound. Water your soil if it's dry. It will be simpler to separate the roots as a result.
You must do this because, if you don't, your plant will find it much more difficult to emerge from the tightly coiled ball of roots and settle into the soil in your new pot.
To cut the root ball apart makes many people extremely nervous. You shouldn't be concerned. (Read More: How To Prune A Ponytail Palm Plant)
My preferred method is to start by gently pulling things loose by grasping the root ball at the base.
Next, I like to work on the sides of the rootball to loosen them up.
.webp)
When you've somewhat relaxed things, go around the entire perimeter.
Although I almost never do it when repotting ponytail palm and don't believe it's necessary, some people go overboard and remove all of the old soil.
Don't worry about it; you will unavoidably uproot some plants. You will be fine as long as you don't lose your mind and break half the roots off.
In order for the roots to successfully ensnare themselves in the fresh soil of its new home, you must first loosen them.
2. Choose An Appropriately Sized Pot
Choose a pot for your replacement that is just 1-2 inches larger in diameter than your old pot.
Avoid going overboard or giving in to the urge to put it in a pot that is bigger. especially for succulents!
The risk with this is that if your pot is too large, your soil will take a lot longer to dry out, which can promote issues like root rot.
I switched to an 8″ diameter pot from a 7″ diameter pot, but it was deeper.
3. Use An Extremely Well Drained Potting Mix
Making sure to use a soil mixture that is extremely well draining is the final crucial step in successfully repotting your ponytail palm.
I never use potting mix straight from the bag. I don't purchase expensive potting mixtures; instead, I make my own to suit the particular plant I'm working with.
For succulent plants like Beaucarnea recurvata, I like to use two parts of a good succulent soil and 1 part of 1/4″ pumice.
These plants prefer a mix that is EXTREMELY well drained, which you will get this way.
Due to a lack of available pumice, I actually had to use both perlite and pumice. Last but not least, I combined 4 parts succulent soil with 1 part pumice and 1 part perlite.
Once everything has been thoroughly combined, you are ready to proceed. I put everything in my wheelbarrow and mixed it there because I like to repot outside.
I decided that my plant would live in a glazed ceramic pot. Because they breathe and dry out more quickly than other pots, terra cotta pots are particularly good for succulents.
To keep soil in but allow water to drain, I like to place a broken piece of terra cotta pot over the drainage hole in the shape of an upside-down U.
When you add the plant and begin to fill the new pot with soil, gently press the soil down with your hands as you go to ensure that there are no air pockets and that your plant is stable and not swaying. In your pot, you don't want a shaky plant.
You'll want to leave about one inch from the soil to the top of the pot so you have room to water and have a "reservoir." Remember to do this before watering ponytail palm, or it could get very messy!
.webp)
Ponytail Palm Care
Slow-growing trees include ponytail palms. Since they are desert plants accustomed to bright light, they thrive when placed in an area with some direct sunlight. Position your houseplant in a west- or south-facing window and give it outdoor "vacations" in summer. (Read More: How Much Light Does Ponytail Palm Need)
Ponytail palms require well-draining soil, just like many other desert plants do, in order to thrive. Ponytail palms can be planted in regular potting soil or cactus and succulent potting soil. Make sure the pot you choose has plenty of drain holes to let excess water flow out. The University of Florida IFAS Extension claims that leaving your plant in wet soil could cause the roots to rot. (Read More: How Big Do Ponytail Palms Get)
Ponytail palms do best with routine irrigation during the growing season, despite their adaptation for drought conditions. When the top few inches of soil are dry from spring through fall, water the plant thoroughly. Soak the soil of the plant, then let the excess drain away. After watering the plant, empty the saucer so that it doesn't sit in water. Water much less often in the winter.
Read More:
Conclusion: Repotting a Ponytail Palm
Ponytail palms don't require frequent repotting. They can actually last for many years without needing a bigger pot. Ponytail palms should still be in small pots if you want to keep your indoor plants manageable and compact. The size of the plant will increase along with the size of the ponytail palm pot. The University of Arkansas claims that large pots will eventually yield large plants with heavy bases.
Pick a fresh clay pot that is just a little bit larger than the old one when repotting. The ponytail palm's trunk and the rim of the pot should be separated by no more than an inch or two. Use fresh potting soil, filling the bottom with enough to keep the plant's soil level the same as it was in its previous location. As you water it to settle the roots, tuck the soil around the sides.
Latest Updated
- How To Prune A Ponytail Palm Plant with Simple Steps
- How Can I Make My Ponytail Palms Grow Taller & Faster?
- How to Repot Ponytail Palm - A Guide To Transplant
- How Often to Water Your Ponytail Palm?
- How Big Do Ponytail Palms Get - Does It Need Deep Pots
- Is Ponytail Palm Toxic To Cats - Explained & Facts
- Why Does My Ponytail Palm Have Brown Tips - How to Fix
- Ponytail Palm Leaves Drying & Bulb Softening Causes & Care Solutions
- How to Grow and Care for Ponytail Palm (Beaucarnea Recurvata)
- How to Propagate Ponytail Palm (from Seeds & Cuttings)
Popular Articles
- Winter maintenance of Antirrhinum Majus
- How to Grow Terminalia Mantaly Tree
- How to Grow and Care for Crossostephium Chinense
- How to grow Antirrhinum Majus in spring
- Peristeria Elata (Dove Orchid) Profile: Info & Care Guide
- Underwatered Snake Plant (Sansevieria Trifasciata) - Signs And How To Fix
- How to Care for Brazilian Jasmine Plant (Mandevilla Sanderi)
- Rosa Chinensis (China Rose): Plant Growing & Care Tips
- How to Grow & Care for Graptopetalum Purple Delight in Summer
- How to Care for Baby Sun Rose (Aptenia Cordifolia)