Calathea Leaves Curling: 6 Common Reasons and How to Fix
Written by Ivy
Dec 13 2022
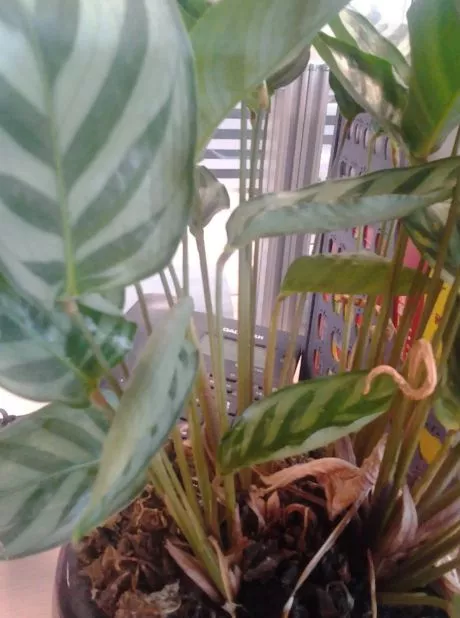
The calathea plant can be fickle at times, but fortunately, it will let you know when something is wrong. Curled leaf edges are one of the primary ways a Calathea will communicate with you that something is wrong. This guide will explain why your plant behaves in this way and how to address the underlying problems.
As a defense mechanism to slow down transpiration and prevent further water loss, cathea leaves curl when they become dehydrated. Underwatering, low humidity, high temperatures, and root rot from overwatering, disease, and overfertilizing are common causes of this condition.
Why Do Calathea Plants Curl Their Leaves?
Calathea leaves are expressive and naturally bendable. To save energy, they will cluster together at night, and during the day, they will bend to follow the sun. You might quickly adjust to seeing your Calathea leaves in a variety of positions throughout the day as a result.
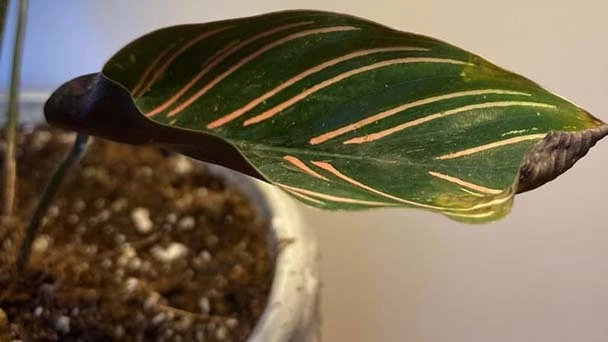
When the outer edges start to roll in on themselves, that's when you need to be concerned. As it can help conserve energy, keep moisture in, and protect it from scorching, this is typically a plant's first defense mechanism against predators.
Too Much Light
Because Calathea plants naturally grow beneath the canopies of bigger trees, they have adapted to more dappled shade. When cultivating a Calathea indoors, it is important to provide it with bright but indirect light and to position it away from midday direct sunlight. The patterns will fade if the leaves are exposed to too much direct light. This has a bad aesthetic and prevents the foliage from absorbing light and generating energy.
Ensure that your plant is not in direct sunlight, or that a window covering that filters light is placed over it, to prevent this. Not direct light, but rather good ambient light, is crucial. The leaves of your Calathea will unfold and recover within days once the lighting conditions are improved, though any leaves that have suffered severe damage must be removed.
Signs to identify curling caused by direct sunlight and heat stress:
- Sunburn is likely to blame if the leaves on your Calathea are curling inward and turning brown at the tips.
- Check your temperature and make sure it is between 65°F and 80°F (18°C and 27°C) for Calathea to grow in the best conditions.
How to fix
- When it's cold outside and it's hot outside, bring Calathea inside where a heater and air conditioner will help it stay at the perfect temperature.
- To ensure that your Calathea grows successfully, try to locate a window that faces east and south and is shaded.
Temperature Problems
When you mimic your Calathea's natural environment as closely as you can, you will see the best results. The most crucial factor in replicating for a tropical indoor plant is temperature. For best results, keep your Calathea between 19 and 29 degrees Celsius. Your Calathea should be able to survive in normal room temperatures, but you should be aware of any cold drafts in your house and keep your plant away from them. Be careful not to leave windows open in the wintertime.
Low Humidity
Calathea plants need humidity to grow properly. The only way to provide Calathea with the moisture they require is to water them; however, they also absorb water through their leaves and roots. The plant's first line of defense when a leaf starts to dry out is to curl up in an effort to hold onto moisture.
Aside from looking dry and brittle, the leaf will also feel that way when this occurs. To rehydrate the foliage, you must first mist the leaves with a spray bottle.
To keep the leaves healthy and vibrant, misting is a short-term solution that should be done frequently. You might consider putting your plant on a pebble tray or placing a humidifier close by for a longer-term fix. Moving your plant into a room that is more humid, such as a bathroom or kitchen, is an additional option. Just make sure the room meets the plant's needs for light and temperature.
Calathea's transpiration rate can significantly increase as the relative humidity falls below 50%, which can result in excessive water loss and curling of the leaves.
Signs of curled Calathea leaves caused by low humidity:
- Given that both conditions result in drooping, browned, and crispy leaves, it can be challenging to distinguish between low humidity and underwatering.
- Purchasing a hygrometer will allow you to measure your humidity level accurately.
How to fix low humidity levels:
- When the plant is actively growing, you should aim for a relative humidity of at least 60% because the Calathea type is sensitive to low humidity levels.
- You can use a pebble tray or a plant humidifier to raise the humidity.
- Additionally, you might want to arrange your plants in groups so that they can help develop and disperse a humid microclimate growing environment.
Incorrect Watering
The amount of water that calathea plants require can be fickle. The plant will dry out from receiving insufficient water, which will result in the leaves curling. Too much water will result in root rot, which prevents the plant from absorbing nutrients, which will cause the leaf to deteriorate and curl up.
Your ideal Calathea soil should be moist but not sopping wet. By sticking a stick or your fingertip into the soil, you can check the moisture levels in your soil a few times per week. Only water your Calathea when the top few centimeters of the soil are dry. It is never advisable to let your Calathea dry out completely.
Make sure not to overwater your Calathea so that water pools on the soil. Make sure your pot has the best drainage you can for it to have a lower chance of too much water collecting in the soil and leading to root rot. Making sure the pot's bottom has lots of drainage holes will help you achieve this. When you water, it's a good sign that the soil has enough moisture when water starts to seep out of the drainage holes.
Your Calathea will go into a dormant stage and use less water from the soil during the winter months. Reduce the amount of watering your Calathea during the winter.
Underwatering – the Most Common Reason of Calathea Curled Leaves
Since when was your Calathea last watered? It's probably been too long and your Calathea plant is already thirsty if you can't recall the last time you watered it.
Remember, when In order to prevent further water loss from transpiration when calathea is dehydrated, it will activate its defense mechanism. As a result, the leaves will curl inward to minimize the surface area through which moisture can escape.
Signs the leaves curling is due to underwatering:
- On your Calathea, look for droopy leaves that have turned yellow and brown.
- By inserting a soil moisture meter probe halfway down and examining the reading, you can determine the amount of soil moisture in your pot. Insufficient watering has occurred if the reading is lower than 3.
How to fix underwatered Calathea:
- Give it a lot of distilled or filtered water until you see the water draining from the holes in the bottom.
- At least once per week, or whenever the top 2 inches of the soil feel dry, calathea plants need to be watered. So that you don't forget, be sure to set an alarm on your phone with a weekly watering schedule.
Overwatering
Let me let you in on a little secret: when I first purchased my Calathea, I used to water it almost every day. I believed that the more water it receives, the quicker a new leaf would develop. I was completely wrong in my judgment!
Your plant's roots will become waterlogged if you overwater it, which will lead to root rot. Because of the damage and decreased ability of the roots to absorb nutrients and water, this causes dehydration.
Signs of Calathea leaves curling due to overwatering:
- Browning on the tips of the leaves is the first indication of overwatering on Calathea
- The soil will have a strong, unpleasant odor– often a clear sign of root rot
- If your soil is still wet more than a week or two after you watered it, this is typically a sign of inadequate drainage and overwatering.
How to fix overwatered Calathea:
- The leaves of your plant may curl as a result of wet soil. Before watering again, be sure to wait until the top 2 inches of soil have dried.
- Your Calathea should be repotted into a new pot with fresh soil if the soil hasn't dried out after two weeks. To improve aeration and drainage, incorporate coarse materials—like shredded bark, perlite, or even fine gravel—into the potting soil.
- Make sure your pot has a drainage hole that can be used to let excess water run off.
Water Quality
Calathea plants are vulnerable to mineral and chemical buildup in their soil. Usually, when you water your plant with tap water, this buildup occurs. You might occasionally notice a buildup of salt on top of the soil; this is more frequent in areas with hard water. Use only filtered tap water or bottled water to water your Calathea in order to prevent this from happening. Water temperature is another factor to take into account. Since room temperature water doesn't shock the roots as much as cold water, calathea plants prefer it over cold water.
Signs of curling leaves due to hard water:
- Fluoride poisoning in Calathea plants manifests as leaves that become dry and brittle and show yellowing or browning at the tips.
- As hard water evaporates, it leaves a white, chalky residue on the leaves, stems, and even the soil.
How to fix the effect of hard water:
- It is best to repot your Calathea into new, fresh soil if the soil has accumulated too much salt.
- Use either distilled water, filtered water, or rainwater to water your Calathea.
Overfeeding With Fertilizer
I used to believe that my houseplant would be happier and healthier if it received more fertilization. But here's the thing:
If the soil is overly fertilized with salts around the roots, it can cause water moisture to be drawn out of plants rather than absorbed.
The plant will become dehydrated from this lack of water and curl up. Although it can be fixed, salt buildup in the soil will eventually result in root burn damage and kill your Calathea if left unchecked.
Signs of curled leaves due to over-fertilization:
- You'll notice a crusty buildup on the soil's surface or the edges of your pots if you use too much fertilizer.
- You've over-fertilized your Calathea if the lower leaves start to yellow and wilt, as well as show browning at the tips and margins of the leaves.
- If you see any of the aforementioned symptoms, check the plant's roots for rotting, black, or brown roots, which are typically caused by overfertilization.
Fixing over-fertilize Calathea curled leaves:
- Prior to cutting off any rotten roots, dig up the Calathea from the ground. The Calathea should then be repotted in a brand-new pot with fresh soil.
- Use half the dosage suggested on fertilizer packaging going forward, and apply no more frequently than once per month.
Pest Infestation
All of us have experienced this situation: after purchasing a new plant, we soon discovered tiny bugs crawling all over our plant collection.
The majority of pests that consume the tissues and sap of Calathea plants are spider mites. These pests can make the leaves curl and disfigure them.
Signs of pest infestation:
- Spider mites are hard to see, but wrinkled, dry leaves with webbing along the underside may be a sign of them.
How to eradicate these pests:
- To temporarily repel these insects, apply neem oil to the infected area.
- To completely get rid of the pests, wash both sides of the foliage with a cotton pad or cloth dipped in a light solution of water and dish soap.
- Regularly wiping your Calathea leaves will help you to spot any pest infestation early
In Conclusion
Although there are many potential causes, dehydration is typically the primary factor in a Calathea plant curling up. Therefore, it is crucial that you take good care of and give your Calathea a suitable environment.
FAQs
How Often Should I Water Calathea?
When it comes to watering indoor plants, I never advise sticking to a strict schedule. This is due to the fact that the amount of water they require depends on the season and the area in which you live. Your plant will need to be watered more frequently in areas with warmer temperatures and high humidity levels. Less frequent watering is required for plants in dormancy and in cooler climates.
Use a moisture meter or dig two fingers into the soil at least 2 inches deep. Your plant needs watering if the soil is wet two inches below the surface. Hold off on watering if the soil is already wet and recheck in a few days.
When checking back, if the soil is still wet, take into account the potting medium you're using and the size of the drainage holes in your pot or container.
Should I Bottom Water Calathea?
Bottom watering is something I do advise doing for Calathea because that way the soil is only absorbing as much water as it can. On the other hand, watering from the top down enables excess water to drain out while also assisting in the flushing out of salts and minerals that may remain in the soil after fertilization or when watering with regular tap water. Top watering aids in avoiding root burn and overfertilizing.
If you choose to water from the top down, make sure the pot or container has enough drainage holes and that the soil is permeable. Below is more information on soil that drains well.
How Do You Fix Overwatered Calathea?
A Calathea that has become overwatered needs to be taken out of its pot or container as soon as possible. I constantly advise getting rid of the old soil and replacing it with new, well-draining soil.
Additionally, think about how well the current pot or container works. If it doesn't have enough drainage holes, get a new one with better drainage.
Spend some time inspecting the roots of your Calathea before repotting. In order to examine the soil and root texture in detail, especially at the tips, carefully brush away as much soil as you can.
It will be necessary to carefully pull out any brown, black, soft, or mushy roots. To prevent the spread of infection, make sure you re-sanitize your cutting tools' blades after each cut and use sterile cutting tools to remove all traces of diseased roots.
Latest Updated
- Benefits of Bugleweed - 7 Science-backed Health Benefits
- Bugleweed Dangers & Side Effects - Is It Poisonous?
- How to Plant Evergreen Trees - What You Should Know
- When to Plant Evergreens - Grow Guide for Evergreen Trees
- 12 Wonderful Evergreen Shrubs for Your Garden
- 12 Popular Evergreen Plants with Pictures for Beginners
- When And How To Prune A Lilac Bush Like a Pro
- How to Grow & Care for Lilac Vine (Hardenbergia Violacea)
- Japanese Lilac Tree (Syringa Reticulata) Care & Propagation Guide
- Shumard Oak Pros and Cons - What to Know
Popular Articles
- Winter maintenance of Antirrhinum Majus
- How to Grow Terminalia Mantaly Tree
- How to Grow and Care for Crossostephium Chinense
- How to grow Antirrhinum Majus in spring
- Peristeria Elata (Dove Orchid) Profile: Info & Care Guide
- Underwatered Snake Plant (Sansevieria Trifasciata) - Signs And How To Fix
- How to Care for Brazilian Jasmine Plant (Mandevilla Sanderi)
- How to Grow & Care for Graptopetalum Purple Delight in Summer
- Rosa Chinensis (China Rose): Plant Growing & Care Tips
- How to Care for Baby Sun Rose (Aptenia Cordifolia)