How to Build a Shotgun Fruiting Chamber with Simple Steps
Written by Ivy
Jan 06 2023
You must reproduce these conditions and initiate fruiting in order to grow mushrooms at home, but this is not always simple.
Quick Steps:
- Step 1: Measure and Mark Hole Locations
- Step 2: Drill Holes
- Step 3: Add The Perlite
- Step 4: Find a Suitable Location For Your Shotgun Fruiting Chamber
- Step 5: Elevate Your Shotgun Fruiting Chamber
Maintaining high levels of humidity while allowing sufficient fresh air exchange to create the ideal environment for their mushrooms is one of the biggest challenges for many indoor mushroom growers.
Fruiting chambers can be used to solve this problem. Beginner mushroom growers should start with a shotgun fruiting chamber.
This article will explain what a shotgun fruiting chamber is, how it operates, what materials are required to make one, and how to construct and use one.
What is a Shotgun Fruiting Chamber?
An easy-to-build, low-maintenance mushroom fruiting chamber is known as a shotgun fruiting chamber, or SGFC.
It consists of a large, transparent container with holes drilled all the way around, including the top and bottom, and a layer of damp perlite that is 2 to 4 inches (5 to 10 cm) thick at the bottom.
The scattered pattern of ventilation holes that resemble shotgun bullet holes gave rise to the name "shotgun fruiting chamber."
It's perfect for novice growers using Pf tek cakes or bagged mushrooms like oyster, reishi, lion's mane, chestnut, or shiitake.
Those who are unsure of what a Pf tek cake is should know that it is a block of colonized substrate produced using the Psilocybe fanaticus technique or Pf tek.
This method makes it simpler for novices to grow mushrooms at home and is suitable for a wide variety of mushroom species. It also uses materials that are easily accessible.
Do You Need a Fruiting Chamber?
No, you don't always need a fruiting chamber to grow mushrooms, and one of the determining factors is your local climate.
You can grow mushrooms outdoors on logs, on kitchen countertops, in mushroom beds, and other places with the right humidity and temperature conditions.
It's not so simple, though, in regions with high temperatures. You must establish fruiting conditions in order to encourage fruiting and grow healthy mushrooms.
Finding the ideal balance between fresh air exchange and humidity is one of the hardest tasks for many growers.
This equilibrium is simpler to maintain in a fruiting chamber, and mushrooms grown there require less attention and input.
What Triggers Mushroom Fruiting?
When the weather is suitable for mushroom growth, such as when it is warm, humid, sunny, and has fresh air, mushrooms will fruit in the wild.
The goal of your fruiting chamber is to reproduce these environmental factors so that it can alert the fungus mycelium developing in your mushroom substrate that it is time to bear fruit.
What Temperature Should a Fruiting Chamber Be?
Depending on the type of mushroom you're growing, different temperatures should be used in the fruiting chamber.
However, maintaining a fruiting chamber temperature between 60 and 65 °F (15.5 and 18 °C) is a safe range.
Most mushrooms enjoy cooler autumn temperatures, though some summer oyster mushroom varieties, like phoenix oysters, prefer warmer temperatures.
How Wet Should a Fruiting Chamber Be?
You'll need humidity levels of 75% to 90% in your fruiting chamber, depending on the stage of your mushrooms' growth. Humidity is a key factor in mushroom growth.
Aim to maintain relative humidity levels above 80% for later growth stages and around 90% for mycelium to begin pinning.
Do You Need Light in a Fruiting Chamber?
Fungi require indirect light to grow, even though they don't need direct light to produce food like plants do. They won't bear fruit if kept in complete darkness.
In the natural world, sunlight would signal to an underground fungus that it has emerged from the substrate and is now ready to bear fruit.
The fungus needs to produce mushrooms outside of the substrate in order to reproduce and spread to new areas, so this knowledge is essential.
Why Do You Need Fresh Air Exchange in a Fruiting Chamber?
The growth of the mushroom is impacted if the CO2 levels inside your fruiting chamber rise too high because as fungi grow, they consume oxygen and produce CO2.
In the wild, mushrooms emerge from the soil or rotting logs into the oxygen-rich air.
When colonizing a substrate, fungal mycelium can withstand and occasionally even requires higher levels of CO2, and being in contact with fresh air encourages fruiting.
Because in nature the mycelium reaches the surface when there is more fresh air than below, adding fresh air and reducing CO2 levels mimic natural conditions.

How Does a Shotgun Fruiting Chamber Work?
A shotgun fruiting chamber constructed properly uses natural air currents to maintain humidity and provide continuous exchange of fresh air.
Through the holes in the container's bottom, fresh air is allowed to enter the chamber. The moisture in the damp perlite then evaporates as it rises through it, raising the humidity.
Because warm air rises, the warmth produced by the expanding mycelium is sufficient to draw the humid air up through the perlite.
In order to let more fresh air in from the bottom, the warm, humid air flows up and out the container's top holes.
The design of the shotgun fruiting chamber permits continuous fresh air exchange without lowering humidity.
Monotub Vs Shotgun Fruiting Chamber
Since they both use a transparent container or tote, a monotub and a shotgun fruiting chamber are both simple to construct and strikingly similar in appearance, but you use them very differently.
Here are some of the differences:
- Size of holes – Shotgun fruiting chambers have many tiny 0.25 inch (0.6 cm) holes on all six sides, including the top and bottom, whereas monotubs only have a few 2-inch (5 cm) holes on the sides.
- Surrounding airflow – For the natural currents in a SGFC to function, the area must be free of opposing airflow. However, having a fan in the space is advantageous when using a monotub. although not specifically at the tub.
- Method of use – When using monotubs, the substrate and grain spawn are added right to the monotub, and both incubation and fruiting happen there.
When using a SGFC, you put fully colonized PF tek cakes or grow bags in the chamber for fruiting.
- Hole covering – Shotgun fruiting chamber holes are left uncovered, whereas monotub fruiting chamber holes receive some sort of filter during fruiting and are entirely covered during incubation.
- Use of perlite – A monotub does not use damp perlite at the bottom of the bin like a SGFC does to maintain high humidity levels. Vermiculite-containing bulk substrates are frequently used with monotubs as a means of preserving moisture.
Materials Needed to Build a Shotgun Fruiting Chamber
Once you have the components, you can construct a shotgun fruiting chamber in less than an hour with just a few common tools.
Materials Needed
- Two substrate blocks or grow kits fit well in a clear plastic tote with a lid that has a capacity of about 70 quarts (66 liters).
Your tote needs to be tall enough to accommodate fruiting blocks and growth as well as 2 to 4 inches (5 to 10 cm) of perlite.
Small totes can't build their own circulation system, and extremely large totes may cause uneven airflow.
- 10 to 12 quarts (9.5 to 11.5 liters) coarse perlite – The lightweight material known as perlite is made by heating volcanic glass to very high temperatures.
Gardeners frequently add perlite as a soil amendment to improve soil water retention. Most garden supply stores sell perlite.
- A spray bottle
- Something to elevate the SGFC
- Hygrometer (optional)
- Artificial lighting (optional)
Tools Needed
- A Power Drill with a ¼-inch bit
- A measuring tape or ruler
- A permanent marker
How to Make a Shotgun Fruiting Chamber Step by Step
Make a shotgun fruiting chamber by following the directions listed below.
Step 1: Measure and Mark Hole Locations
Measure and mark the areas where the holes will be using a measuring tape or ruler and the permanent marker.
You need to have holes on all sides of your tote, including the bottom and lid, that are evenly spaced so that air can flow through the chamber properly.
The majority of growers concur that a grid of holes spaced 2 inches (5 cm) apart produces the best results.
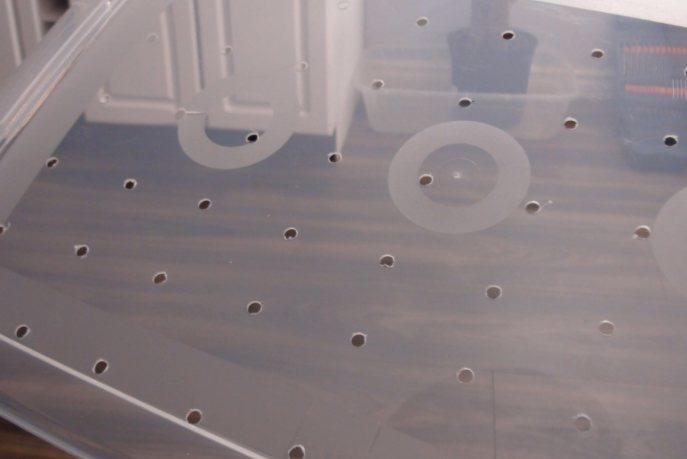
Step 2: Drill Holes
It's time to start drilling after you've marked the locations of each hole.
Drill carefully through the plastic using a ¼-inch drill bit, being careful not to press down too hard and crack the material.
Crack prevention is aided by drilling slowly and at a higher speed while using little pressure.
When you're done drilling, scrape off any shards or protruding pieces that are stuck to the edge of the holes, wash, and then dry the bin.
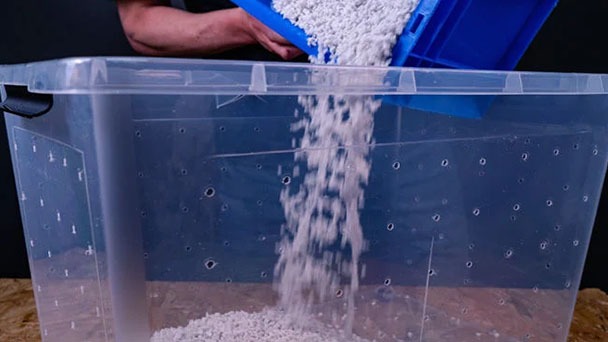
Step 3: Add the Perlite
With coarse perlite, fill the bottom of the tote to a depth of 2 to 4 inches (5 to 10 cm). The layer's precise depth is unimportant.
You'll require enough perlite to evenly cover the bottom of the tote with a few inches of it. It must, however, still have a minimum of 5 inches (12 cm) of open space above the perlite to allow for adequate airflow.
A small amount of perlite may leak through the holes as you add it and mix it, but this should quickly stop.
Use the coarsest perlite you can find to aid in preventing this. Finely ground perlite will fall through the holes and does not hold as much water as coarse perlite.
Small air spaces and nooks and crannies in coarse perlite help it to hold and capture water.
Pour water over the perlite layer you've already placed in the trash can, mixing it in with your hands or a wooden spoon to distribute it evenly.
To moisten the perlite, use just a little water. It is not necessary to soak it until water is dripping from the tote's bottom holes.
It is intended to wet and cover the perlite with water, which will slowly evaporate and raise the tote's humidity levels.
Is Vermiculite Safe to Use in a Shotgun Fruiting Chamber?
Vermiculite is frequently used in monotubs and in recipes for mushroom substrate, but it wouldn't be a good choice for the bottom of a shotgun fruiting chamber.
While both products are similar, vermiculite retains water and has nutrients, whereas perlite has no nutritional value and has a large surface area for water evaporation.
These characteristics mean that while vermiculite can hold more water than perlite, it would not release as much water into the chamber, and its nutrients raise the possibility of contamination.
Additionally heavier and more likely to compact than perlite, vermiculite. Vermiculite makes it more difficult for air to pass through, which raises the humidity levels.
Step 4: Find a Suitable Location for Your Shotgun Fruiting Chamber
Where you place your shotgun fruiting chamber depends on temperature, airflow, and lighting.
The ideal location for a SGFC is a place near a window with soft natural light that is free of drafts.
The mushrooms will dry out in direct sunlight, and it may get too hot in the fruiting chamber.
If using natural light is not an option, you can simulate it using a timer and a small fluorescent or LED light.
If using a fluorescent globe, make sure it is not too close to the fruiting chamber so that it overheats it and set the light to be on for 12 hours per day.
Advice: If you can see inside the shotgun fruiting chamber, there is sufficient light for the mushrooms to fruit.
Your fruiting chamber needs airflow, but it shouldn't be overly drafty. Running a fan close to your shotgun fruiting chamber will dry everything out and obstruct the tote's normal air flow.
Many of the simple-to-grow mushroom species can thrive at room temperature, though each species has different fruiting temperature requirements.
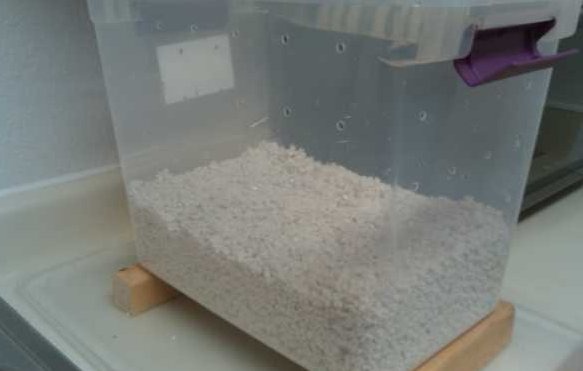
Step 5: Elevate Your Shotgun Fruiting Chamber
You shouldn't place your shotgun fruiting chamber directly on a flat surface for the natural currents to function.
You'll need to use some sort of stand or legs to slightly elevate it.
While many totes have feet that just barely raise the base, growers advise raising your SGFC by at least 2 inches (5 cm).
To make legs, you can use anything you have on hand, but make sure they're strong, stable, and unflippable.
Wide-mouth jars, shot glasses, soup cans, big toy blocks, and lengths of PVC pipe cut to size are some of the suggestions that have been made.
How to Use a Shotgun Fruiting Chamber
Put your Pf tek cakes, grow bags, or kits inside the shotgun fruiting chamber once it is ready for use.
Pf tek cakes should be placed in the chamber on pieces of foil so they are not in contact with the perlite directly.
It's tempting to pack your chamber with numerous cakes, bags, or blocks.
However, the purpose of the shotgun fruiting chamber design is to provide an abundance of airflow around the cakes or blocks, and overfilling the chamber will prevent this.
Shotgun fruiting chambers need to be sprayed and fanned at least twice per day to keep them functioning properly.
Even though SGFCs have holes for air flow, they are insufficient, so you will need to remove the lid and gently fan the mushrooms. Fresh, oxygen-rich air is pumped into the tote to replace the stagnant air at the bottom.
To keep the humidity levels high, you'll need to mist the sides of the tote and the perlite with a spray bottle after each fanning. Spraying water on the substrate blocks and actual mushrooms should be avoided as much as possible because it can lead to mold growth.
A hygrometer is a useful tool that helps you determine when moisture is required because humidity is so crucial for mushroom growth. Additionally, you can modify the moisture levels for the various phases of the mushroom's development.
There are many models to choose from, but not all of them have a range that can measure the high levels of humidity needed for mushroom growth. Make sure the hygrometer you purchase has a maximum measurement range of at least 90% relative humidity.
Pros and Cons of Using a Shotgun Fruiting Chamber
Shotgun fruiting chambers have advantages and disadvantages like other fruiting chambers do, so based on your needs, they might not be the best choice for you.
To help you decide, here are some SGFC pros and cons:
Pros
- Quick, easy and inexpensive to build
- Works for grow bags, substrate cakes and blocks
- Allows you to use natural light to grow your mushrooms
- Creates a humid environment while still allowing fresh air exchange
- You can leave it unattended for up to 14 hours
- You can clean and reuse the perlite
- You can add additional equipment like humidifiers and lighting
Cons
- Limited size only allows small-scale mushroom growing
- Requires daily monitoring and maintenance
- Requires a space with the correct temperature and no drafts
Common Issues + How to Troubleshoot Them
Here are some of the common issues experienced and how to address them:
1. Withered Or Cracked Mushrooms
Mushrooms that are cracked and shriveled are an indication that your humidity levels are too low. Increase the frequency of misting the container and perlite to address this.
Make sure your container is elevated enough to allow air to pass through the perlite and promote evaporation.
2. No Mushrooms Forming
There are a number of potential causes, but inadequate airflow or incorrect humidity are the most common ones.
Monitor and control humidity levels using a hygrometer. Add more holes to your tote or leave the lid off briefly throughout the day to increase airflow.
3. Pale Mushrooms
If your mushrooms are pale, they may not be getting enough light or the temperature may be too high.
You might need to add a few LED lights or extend the time the lights are on if you're using natural lighting.
Check the temperature inside the chamber with a thermometer and, if necessary, relocate it.
Final Thoughts
Shotgun fruiting chambers are the ideal place for beginning mushroom growers to start because they are simple to construct, affordable, and low maintenance.
If you have a spray bottle on hand, all you need to buy is a clear plastic tote and perlite to construct a SGFC. You can complete the project in less than an hour.
Pf tek cakes, grow bags, bulk substrate blocks, and grain spawn are just a few of the colonized substrate types that can be fruited using shotgun fruiting chambers.
However, a shotgun fruiting chamber is not very large, and mushroom growers who want to grow more mushrooms should think about building a martha grow tent or hydroponic grow tent since they offer a lot more space.
FAQs
What is the Size of Shotgun Fruiting Chamber
Shot gun fruiting chambers are essentially just a large 50-90+ L clear plastic box with many small holes drilled in them to allow for some fresh air exchange.
What is the Ideal Temperature of Shotgun Fruiting Chamber
Depending on the type of mushroom, the ideal temperature ranges from 55 to 75 degrees F. Shiitake mushrooms can tolerate a slight increase in temperature, whereas oyster mushrooms and lion's mane prefer temperatures of at least 60 degrees. Keep your fruiting chamber in an area with good airflow.
What is Shotgun Fruiting Chamber Perlite
A shotgun fruiting chamber is an inexpensive way to maintain a high humidity level while still giving the mushrooms fresh air. It is made up of a plastic crate with holes on all sides but the lid. This is done to promote airflow. The base is lined with 3 – 5 cm of damp perlite.
What Are the Differences of Shotgun Fruiting Chamber Vs Monotub
While top fruiting hardwood and manure-loving mushrooms do best in a monotub, shotgun fruiting chambers are best for fruiting mushrooms that grow on substrate blocks or in bags.
Latest Updated
- Benefits of Bugleweed - 7 Science-backed Health Benefits
- Bugleweed Dangers & Side Effects - Is It Poisonous?
- How to Plant Evergreen Trees - What You Should Know
- When to Plant Evergreens - Grow Guide for Evergreen Trees
- 12 Wonderful Evergreen Shrubs for Your Garden
- 12 Popular Evergreen Plants with Pictures for Beginners
- When And How To Prune A Lilac Bush Like a Pro
- How to Grow & Care for Lilac Vine (Hardenbergia Violacea)
- Japanese Lilac Tree (Syringa Reticulata) Care & Propagation Guide
- Shumard Oak Pros and Cons - What to Know
Popular Articles
- Winter maintenance of Antirrhinum Majus
- How to Grow Terminalia Mantaly Tree
- How to Grow and Care for Crossostephium Chinense
- How to grow Antirrhinum Majus in spring
- Peristeria Elata (Dove Orchid) Profile: Info & Care Guide
- Underwatered Snake Plant (Sansevieria Trifasciata) - Signs And How To Fix
- How to Care for Brazilian Jasmine Plant (Mandevilla Sanderi)
- How to Grow & Care for Graptopetalum Purple Delight in Summer
- Rosa Chinensis (China Rose): Plant Growing & Care Tips
- How to Care for Baby Sun Rose (Aptenia Cordifolia)